
How Should You Organize Auction Photos Before Writing Lot Descriptions?
A reliable photo sequence gives each lot a clear beginning, middle, and end. Learn how to separate lots, keep detail shots attached to the right objects, and verify photo groups before generating draft descriptions.
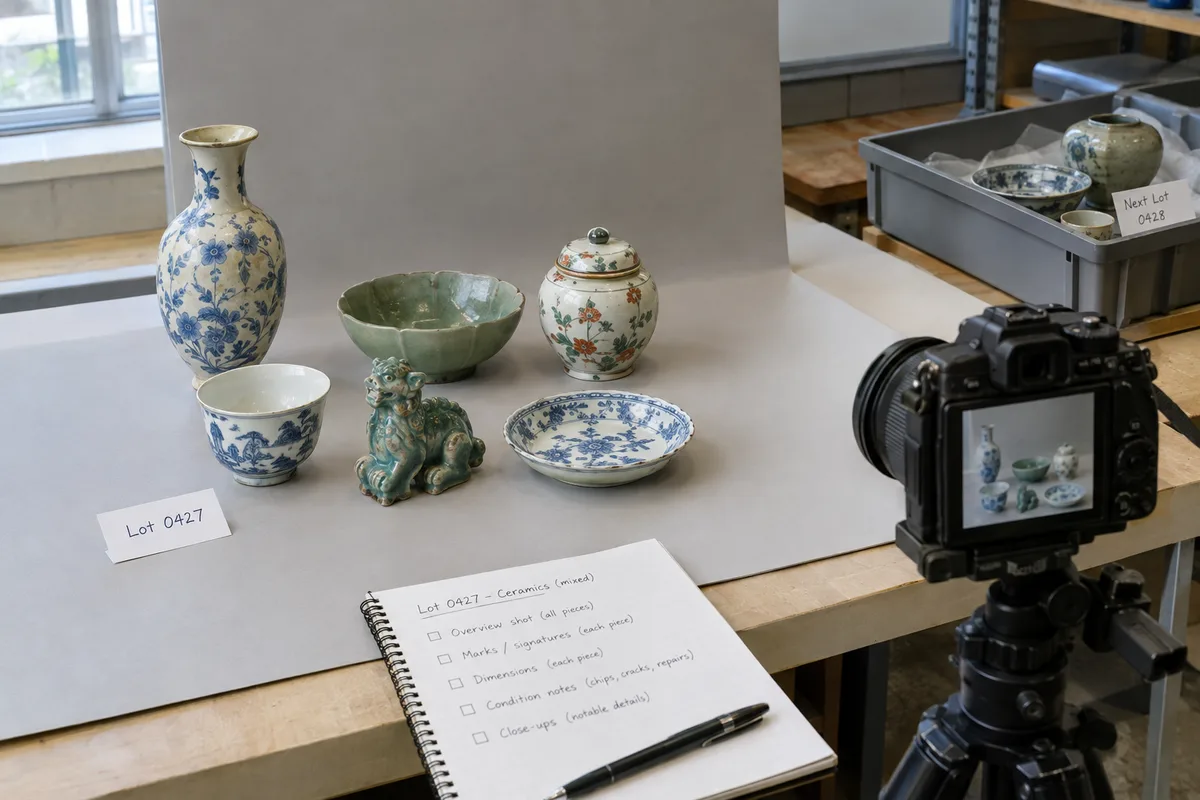
To organize auction photos into lots, keep every lot’s images together, follow the same shooting sequence, and mark where one lot ends and the next begins. Before writing descriptions, verify that each photo group contains only the item or items you intend to sell together.
This matters because a misplaced detail photo can change what a description appears to support. A maker’s mark, accessory, or damaged corner assigned to the wrong group can lead you to draft inaccurate copy even when the photographs themselves are clear.
AuctionWriter’s AI auction cataloging software fits between photography and your existing auction platform: it organizes photos into lots and turns lot photos into draft titles and descriptions. Clear photo groups give you a sound starting point for reviewing those drafts.
How Do You Capture a Consistent Photo Sequence for Each Lot?
Use a repeatable sequence that lets you recognize the subject before you examine its details. You should be able to scroll through a photo group and understand what is included without reconstructing the photography session from memory.
A practical sequence is:
- Overall view: Show the complete item or the entire group being sold.
- Additional views: Photograph the sides, back, underside, or interior as appropriate.
- Identification details: Capture labels, signatures, model numbers, and other visible identifiers.
- Condition details: Show wear, damage, repairs, or missing components that you can observe.
- Supporting views: Add scale references, packaging, or accessories when relevant to the lot.
You do not need the same number of images for every lot. You need the same underlying logic: establish the whole, then document the details.
For a cabinet, that might mean a full front view, side views, an open-door view, a label, and close-ups of visible wear. For a boxed tool set, begin with the complete set rather than a close-up of one tool’s stamp.
Finish the sequence before bringing the next lot into the photography area. If you notice a missed detail later, identify the original lot before taking the additional photograph and place that image with its existing group during review.
Keep original files until you have checked the working catalog. If you rename images, use a consistent pattern such as Lot-0123-01, Lot-0123-02, and Lot-0123-03. Confirm how your upload workflow sorts files rather than assuming that filename order and capture order will always match.
How Can You Make Boundaries Between Lots Easy to Recognize?
Make the transition between lots visible in both your physical workflow and your image sequence. Do not rely only on a change of object, especially when you are photographing similar merchandise.
Start by defining the lot before you photograph it. Decide whether you are selling one chair, a pair of chairs, or a larger group. Keep everything outside that lot out of the frame.
Use a simple boundary routine:
- Place the current lot in a dedicated photography area.
- Record a readable lot identifier in an opening reference image or alongside your capture notes.
- Photograph the full sequence without mixing in another lot.
- Move the completed lot to a separate area before staging the next one.
If you use identifier cards, keep them legible and consistent. A card that reads 123 for one lot and an unclear handwritten abbreviation for the next creates more interpretation work. Check whether each card is a working reference or an image you intend to publish, and exclude reference-only images from the final catalog when appropriate.
Repeated objects need extra care. Two similar lamps can look interchangeable in thumbnails, while their labels, shades, or condition differ. Keep each lamp’s identifier with its own sequence and compare the overall views before assigning close-ups.
When multiple people photograph inventory, agree on the identifier format and sequence before work begins. Avoid combining camera batches into one folder without retaining a way to identify their origin. A shared process makes your auction photo management easier to check when files arrive from different workstations.
The goal is not to create elaborate filing rules. It is to make each handoff obvious enough that another cataloger can tell where a lot starts and stops.
How Should You Handle Detail Shots and Multi-Item Lots?
Treat every close-up as evidence that needs a parent image. If you cannot tell which object a detail belongs to, the photo group is not ready for drafting.
For a small mark or damaged area, take a contextual view before the tight close-up. A photograph of the underside of a vase followed by a close-up of its mark is easier to interpret than an isolated mark between photographs of several ceramics.
Keep these supporting images inside the same lot group. Do not create a separate lot simply because a close-up looks different from the overall photograph.
For multi-item lots, establish the contents before photographing individual pieces:
- Take a group overview. Show all items intended for the lot together, where practical.
- Record the count. Check the physical contents rather than inferring the quantity from overlapping objects.
- Photograph relevant components. Show individual pieces when their identity or condition needs explanation.
- Keep components together. Return pieces to the same tray, shelf space, or container after photographing them.
For example, if you are selling six assorted hand tools as one lot, start with all six visible. Follow with any necessary individual views. Before drafting, confirm that no tool shown belongs to the neighboring lot and that no included tool is missing from the overview.
Be equally clear about accessories. Photograph a camera and its included lens, case, and charger together before taking separate detail shots. Keep nearby accessories out of frame if they are not included.
Do not let presentation imply that a loose accessory belongs to an item when you have not confirmed the connection. Record uncertainties in your working notes and resolve them before publishing. Photos can show what is present; they do not, by themselves, establish compatibility, completeness, or authenticity.
What Should You Verify Before Generating Draft Copy?
Review the photo groups before asking software to draft descriptions. A quick boundary check is easier to manage than correcting a title, description, and image sequence after the wrong photos have been grouped together.
For each lot, check:
- Opening image: Does it clearly establish the item or group?
- Group boundaries: Do the first and last images belong to this lot?
- Identifiers: Do visible tags and working records agree?
- Details: Can you connect every label, mark, and condition image to the correct object?
- Quantity: Does the recorded count match the intended contents?
- Accessories: Is everything shown intended to be included?
- Image selection: Have you removed duplicates, unusable shots, and reference-only images from the publishing selection?
Pay particular attention to the final images of one group and the opening images of the next. That is where you should look for an orphaned close-up, a repeated overview, or an accessory assigned to the wrong lot.
Once the groups are correct, use AuctionWriter to generate draft titles and descriptions from the lot photos. Review each draft against the images and your inspection notes. Check names, quantities, included components, and condition wording; do not treat generated text as a substitute for examining the lot.
Use your catalog management workflow for a final consistency pass before export. If a description mentions a label or damaged area, confirm that the supporting image appears in that lot. If you split or combine lots during review, update both the image groups and the copy.
AuctionWriter is standalone cataloging software, not a bidding, clerking, or payment platform. After review, it exports catalogs to the auction platforms you already use, including HiBid, Auction Flex, BidWrangler, Proxibid, Wavebid, and LiveAuctioneers.
The organizing principle stays simple: define the lot, photograph it completely, verify the group, and then draft. That order gives you fewer ambiguities to resolve when you turn photographs into a sale-ready catalog.