Video Tutorial
In this Guide:
- Exporting Catalogs from AuctionWriter
- Importing Data to AuctionFlex
- Importing Images to Auction Flex
- Additional Tips & Troubleshooting
Exporting your Catalogs to Auction Flex
1. Navigate to your catalog
When you’re ready to import your catalog into Auction Flex, click the Export button located in the upper-right corner.

2. Set Export Settings
- To include both data and images in the export, select Data & Images.
- From the dropdown menu, select Auction Flex as your platform.
-
Tip: Check Catalog
-
Auction Flex 360 limits lot titles to 50 characters during bulk import. When you click “Check Catalog” in the AuctionWriter export modal, you’ll see a list of lots exceeding this limit, allowing you to quickly adjust them before exporting.
-
You can also set the title length to a maximum of 45 characters before generating items. This setting can be found on the “New Lot” page under the format field.
-
-
Tip: Check Consignor Codes
-
Make sure to use the unique consignor code generated by Auction Flex (a combination of letters and numbers). Do not enter customers’ first and last names in the consignor field in AuctionWriter.
-

- Click Export to download your catalog on your device.
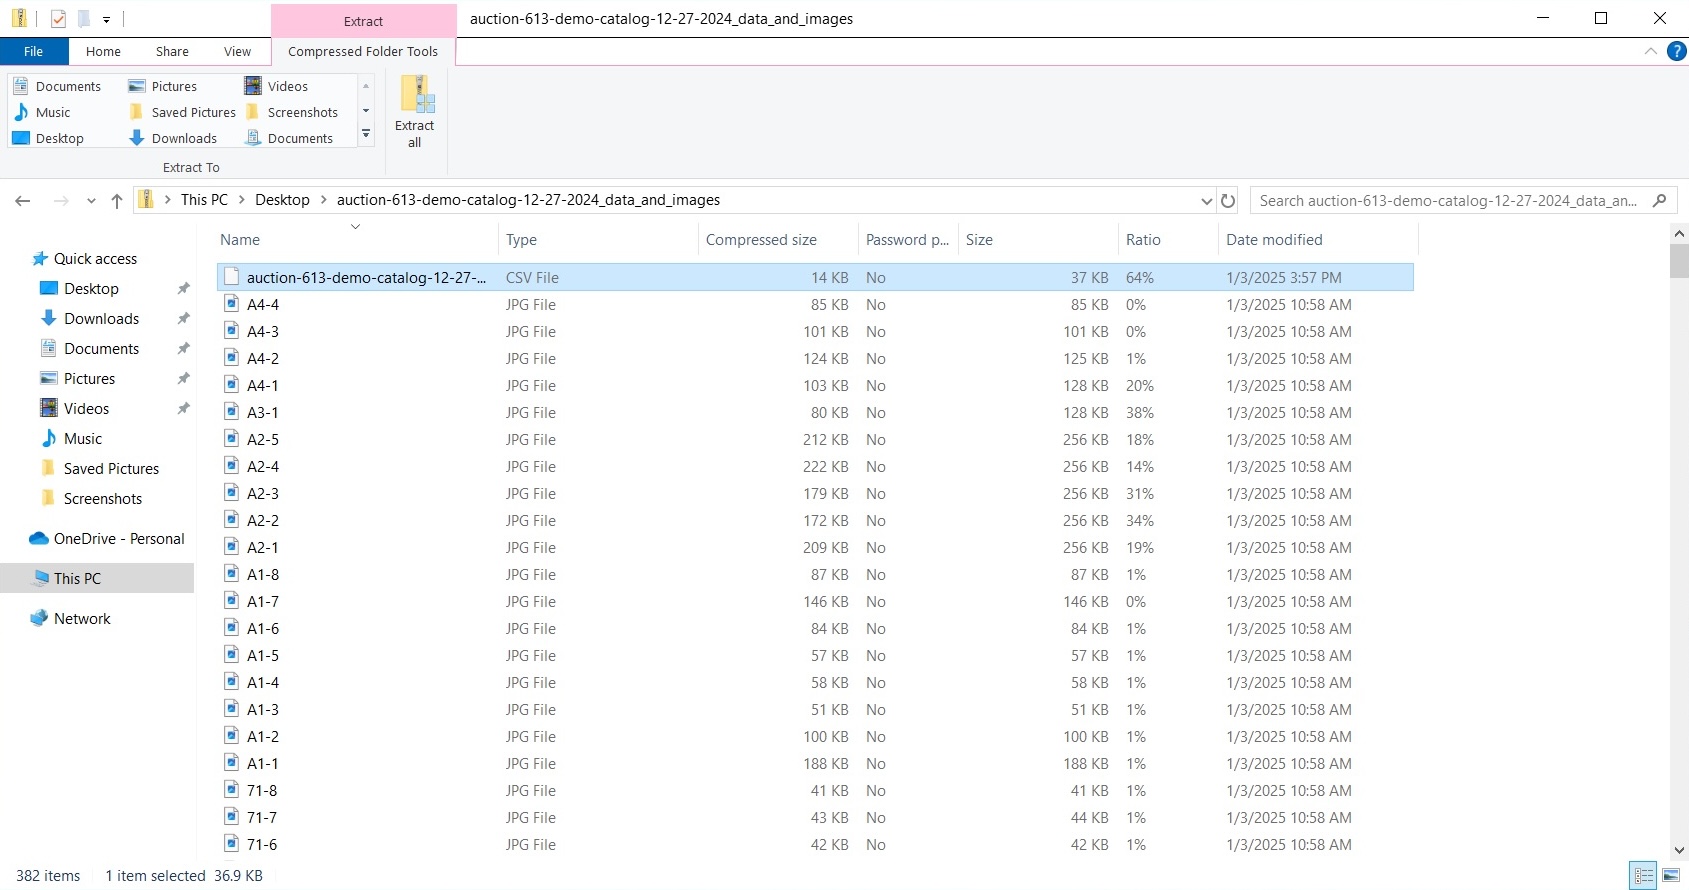
3. Extract the File
- Locate the .zip file, right-click, and select Extract All.

- For more detailed instructions, see our guide on unzipping files on Mac and Windows.
4. Verify the export
- After extracting the file, you should see a single folder containing all images and data (a single .csv file) for your auction.
- Image files will follow a consistent naming format, matching the corresponding lot or inventory numbers.
Importing Data to Auction Flex
Note: After completing your first import, future imports will be significantly faster, because Auction Flex will remember your import settings.
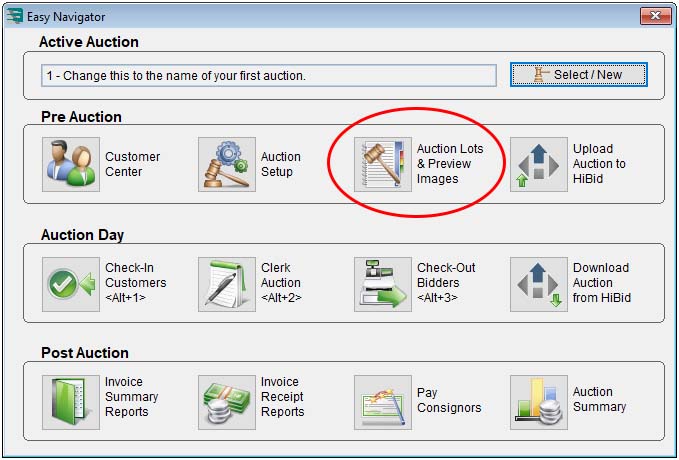
1. Access the Import Function in Auction Flex
- Navigate to the Easy Navigator screen in Auction Flex.
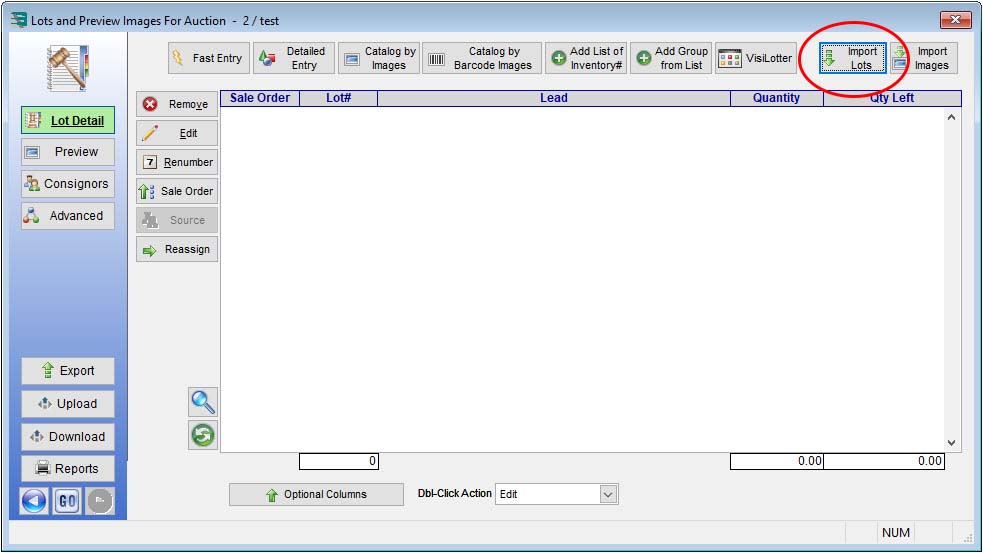
- Click Auction Lots & Preview Images
- Then, click the Import Lots button:
2. Select and Upload Your Spreadsheet:
- Use the Browse button to locate and select your exported .csv file:
- By default, Auction Flex will search for files on your local drive (this is typically C:). However, for cloud users, you will need to look for a drive called something like “M..Client C:“
- NOTE: If you’re using Auction Flex Cloud make sure you have the correct drive selected. Otherwise, you may not see your CSV file in the file manager. If you are having trouble locating your files, please reach out to Auction Flex support for assistance 833-217-5519.
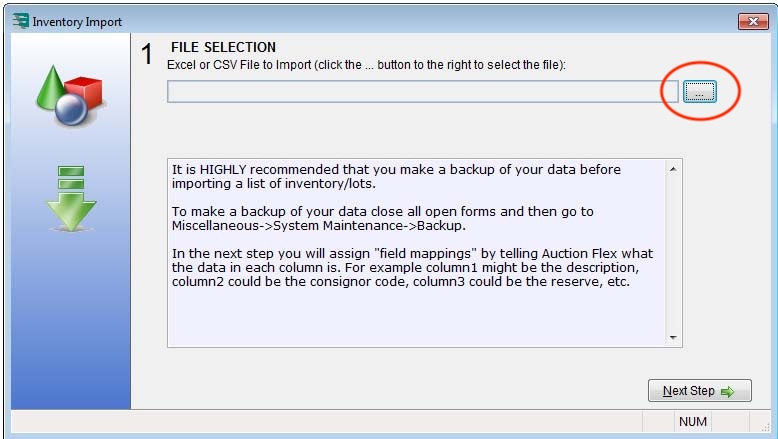
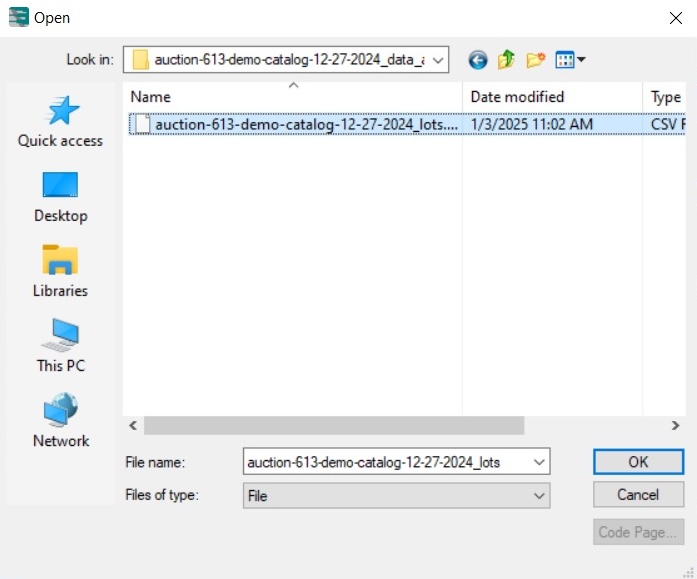
- Once selected, click the Next Step button to proceed.
3. Map Spreadsheet Columns to Auction Flex Fields:
- Add the corresponding fields, you must follow the exact order from top to bottom:

- Order matters. Make sure that the fields are listed in the following order:
- Lot#
- Lead/Title
- Description 1
- Description 2
- Description 3
- Description 4
- Description 5
- Min Est Each
- Max Est Each
- Consignor/Vendor Code
- Quantity
- Do not skip any columns. It is crucial to map each column to a field.
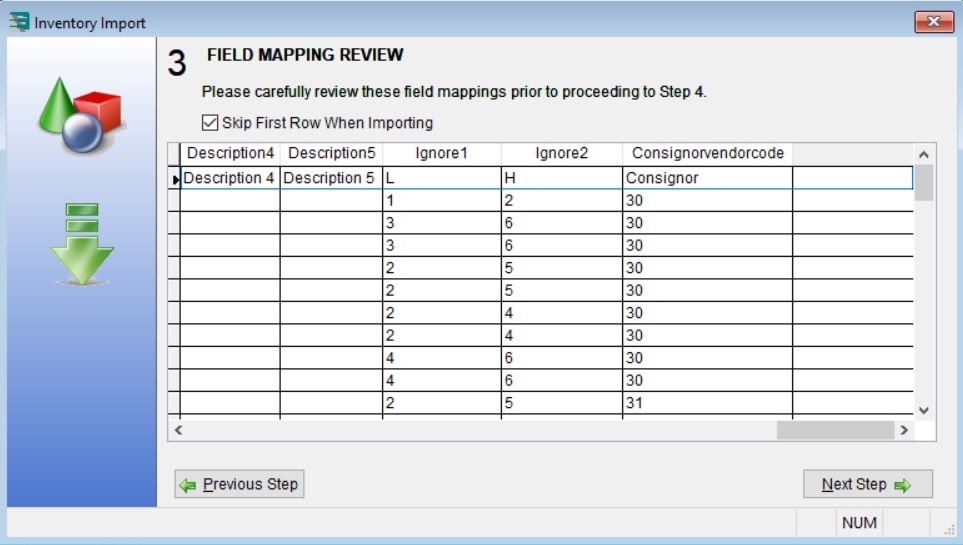
- For data that you do not want to include, apply the “-Ignore Column” fields. For example, to ignore estimates during import, your mapping would look like this:

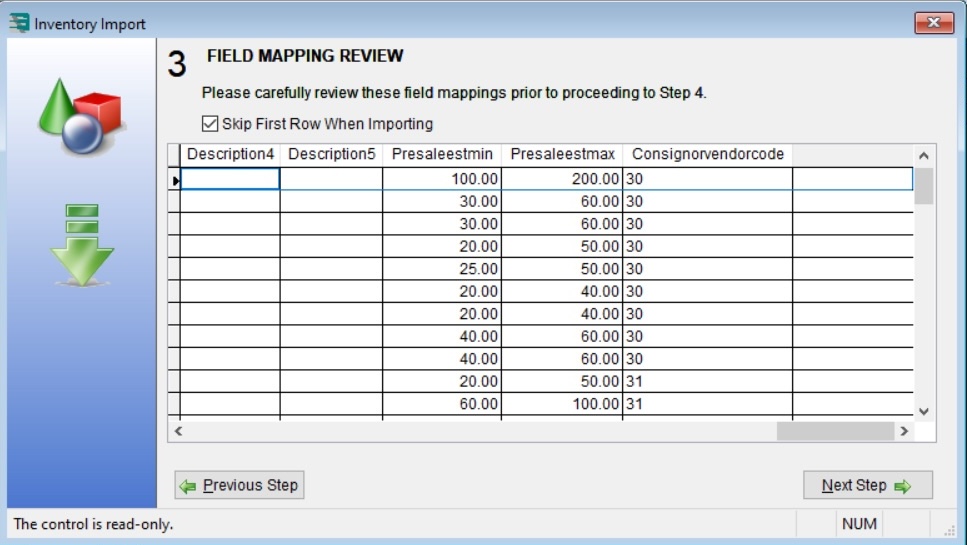
4. Verify Data Alignment:
- When you are finished mapping fields, click Next Step.
- In the preview, you can review if your mapping settings are correct.
- You must check Skip First Row When Importing.
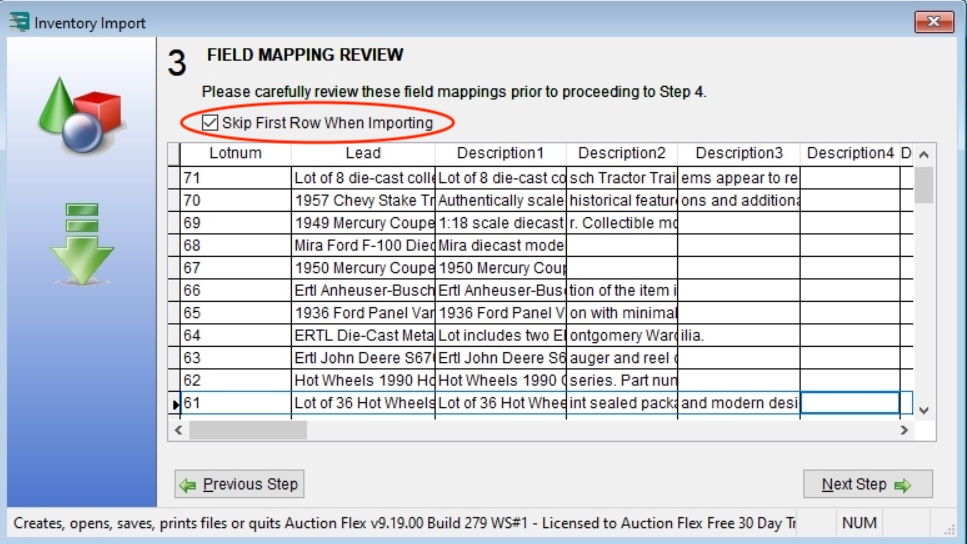
- Use the horizontal scroll bar to view additional columns.
- In most cases, AuctionWriter descriptions are not lengthy enough to populate the Description 4 and Description 5 columns with data. It’s perfectly fine for these columns to appear as empty cells in the preview. However, it’s still necessary to include these fields during mapping to ensure accurate data transfer.
- When mapping fields to “Ignore column”, the preview will look something like this:
- Click the Next Step button to continue.
5. Miscellaneous Options
In this step, you can set additional preferences as needed to align with your auction setup:
- Combine Descriptions: Uncheck the box in the second field.
- Fallback Consignor ID: Use the third/final field to assign a fallback consignor ID. Even if individual consignor codes are already assigned, including a fallback is best practice.
- If a lot is missing a consignor ID, Auction Flex will skip it during the import, potentially causing issues such as misaligned lot images. Should this occur, it’s recommended to delete the entire auction, make corrections, and re-import to avoid further disruptions.
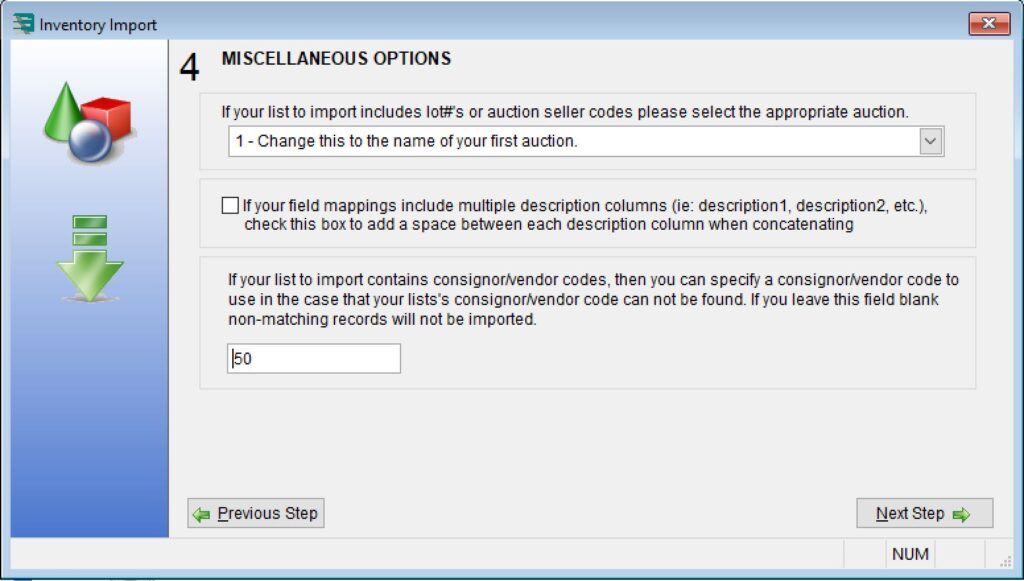
- Click the Next Step button to continue.
6. Image Options
- In the Inventory Import Step 5 window, choose “Do Not Use”
- While it may seem convenient to import images simultaneously with your catalog data, this feature has been found to dramatically slow down the import process.

- Click the Next Step button to continue.
7. Execute the Import
- In the Inventory Import Step 6 window, initiate the import by clicking the Import Inventory button.
- Monitor the process for any errors or warnings, and review the import summary upon completion.
- If a message appears, understand that sometimes these messages are not reporting errors with the importing process. However, they are important to address for a smooth auction. Here is an example of a import summary with a warning message:

Here’s an example of how to address warning messages effectively:
- Identify the Warning:
- For instance, the warning “NO Match Consignor Code” indicates that Auction Flex could not map a consignor code to a specific lot.
- Steps to Avoid This Error:
- Verify that each lot in your AuctionWriter catalog has an assigned consignor number.
- Ensure that all consignor numbers in your AuctionWriter catalog already exist in Auction Flex before importing (see details below).
- Assign a fallback consignor number during the import process (refer to Step 5: Miscellaneous Options for more information).
By taking these proactive steps, you can minimize errors and ensure a smoother import process.
Importing Images into Auction Flex
1. Start Image Import
- Click Import Images in the top-right corner of the auction window.

2. Select and Upload Your Images Folder:
- Use the Browse button to locate and select your exported image folder.

- Then, click Next Step
3. Apply Key Settings:
- Select Auction + Lot # and assign the appropriate auction in the drop down.
- Check Smart Auto-Fill to ensure multi-image lots transfer correctly.

- Then, click Next Step
- Select Assume filename is lot#/inventory#

- Then, click Next Step
4. Review the Draft:
- This panel will show a draft of how images will import alongside the lots in your auction. If something seems off, you can manually update the lot number for a given image in this step.

- Once everything looks correct, click Next Step.
5. Execute the Image Import
- Click Import Images

It may take a few minutes for this process to complete. Once it is complete AuctionFlex will return you to the auction catalog screen. To confirm that the import worked, double-click on any item in your catalog and navigate to the ‘Images’ tab in the window that appears.
Additional Tips & Trouble Shooting
Navigating Title Character Limits
1. Check Catalog for Character Limits:
Auction Flex will limit titles to 50 characters during import. While your lots with longer titles will still upload, any titles exceeding 50 characters will be automatically shortened. To work around this technical restriction:
- After selecting Auction Flex during export, a notice appears below the dropdown.
- Click Check Catalog to view lots exceeding the 50-character title limit.

- From this screen, you can manually adjust titles. However, our next tip may provide an even more efficient solution.

2. Optimize Text Length:
Setting text length limits in AuctionWriter can reduce the number of lots you need to manually adjust at export.
- Navigate to the “New Lot” page.
- Click the field “Format”.

- In the pop-up window, select the Text Length tab.
- Under Title Range set the Maximum to 45 characters (because AI is not 100% accurate).
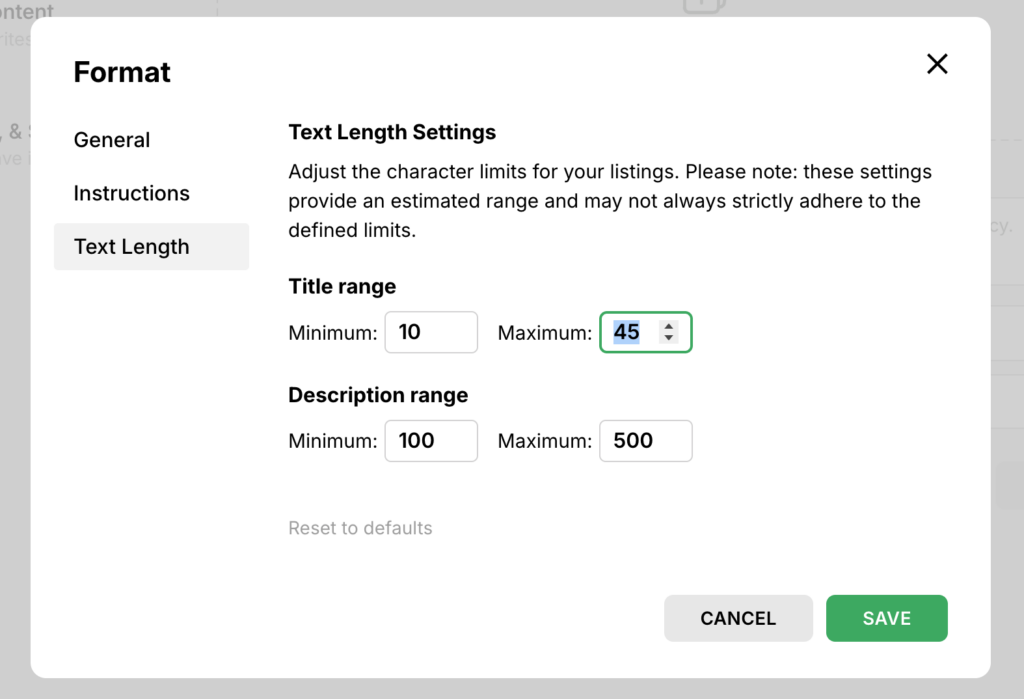
- Now, when you Check Catalog at export, you can regenerate lots instead of manually editing them.
- Click the ellipsis (…) to open a menu, then select Regenerate.

- Click “Regenerate”

- You don’t need to wait for AuctionWriter to finish rewriting one lot before regenerating another. AuctionWriter processes regenerated lots in a queue.
- Refreshing the page will remove lots with optimized titles from the filter.
Avoiding Consignor Code Errors
- Ensure all lots have a Consignor Number before exporting from AuctionWriter.
- Ensure all consignor IDs exist in Auction Flex before importing.
- You can verify consignor IDs under a customer’s CustCode field in Auction Flex:
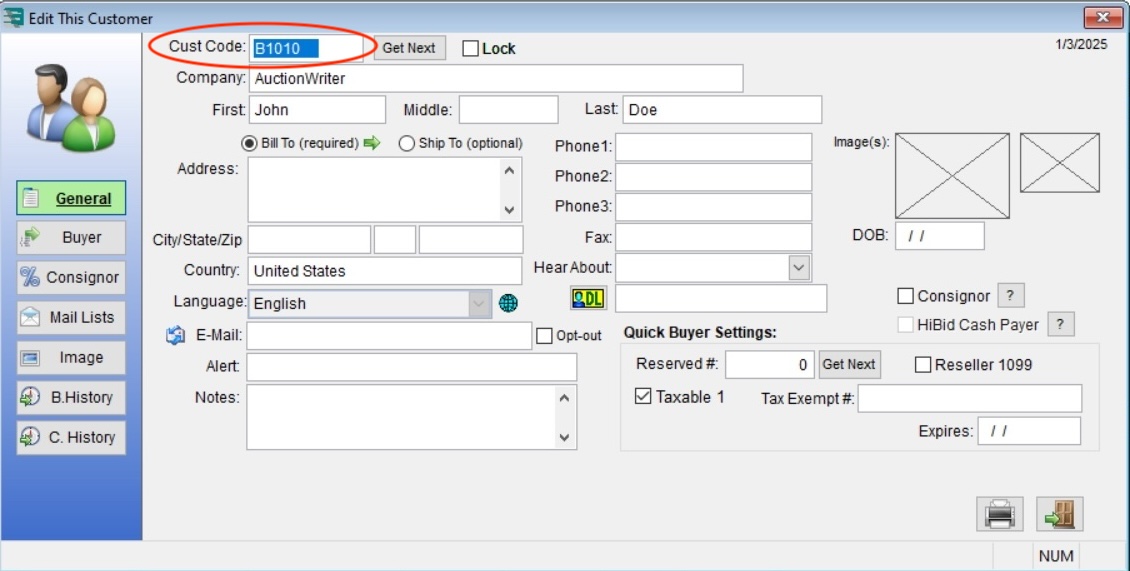
- Use the fallback consignor number to ensure all items are assigned IDs (See the Miscellaneous Options step under the Importing Data section above for more on this tip).
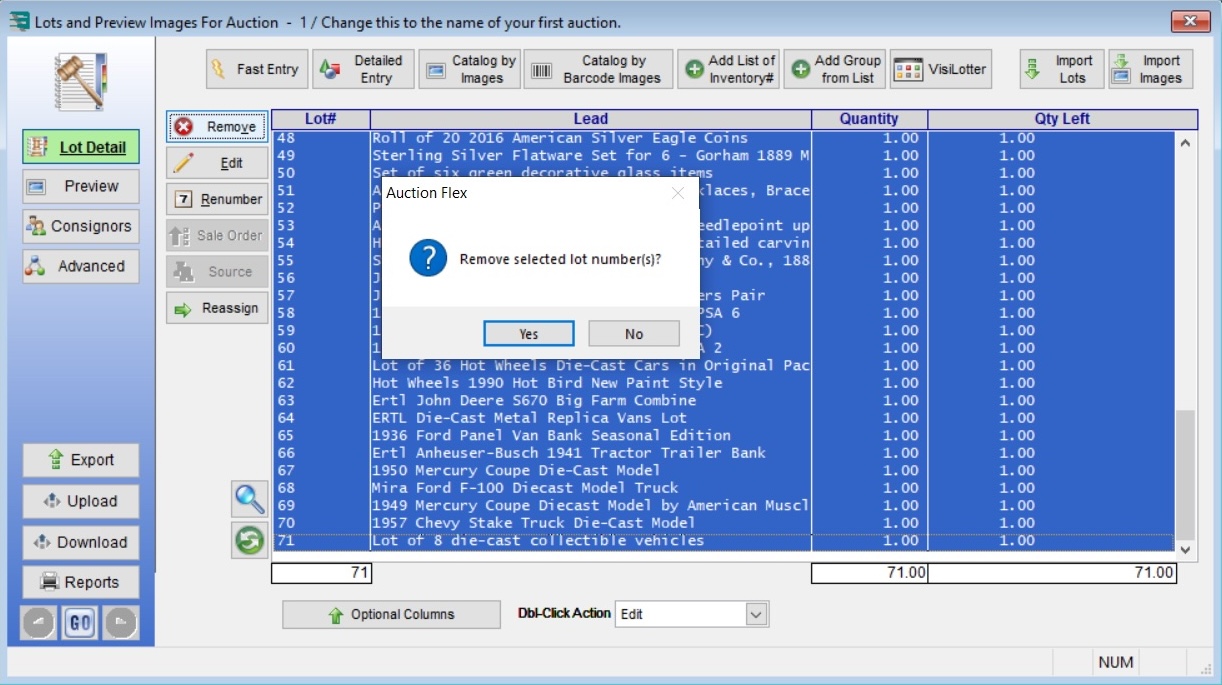
Dealing with Skipped Lots
- If lots are skipped during import (e.g., due to missing consignor data), delete all lots in the catalog. Skipping one lot misaligns the entire catalog, so it’s best to start fresh. Identify the source of the error and adjust your AuctionWriter catalog or import settings before retrying.
Summary & Additional Support
By following this guide, you’ll successfully import your AuctionWriter catalogs to Auction Flex. We understand the export process can seem overwhelming the first time. Should you have any questions or need further assistance, do not hesitate to contact our support team– we’re here to help!